Testing Network Faults Connection
Summary: Help with testing connection or network problems.
2. Testing Your Network
3. Using the command line
4. Ping - "Can my data reach the destination?"
5. Traceroute - "How does my data reach its destination?"
6. DNS Lookup - "Is my data going to the right address?"
7. Netstat - "What's my computer connecting to?"
8. Telnet - "Can I connect to it?"
9. Netshell - "One-stop network check"
1. Introduction
There are many possible causes of connection problems. This guide will show how you can investigate problems using some simple tools that come with most versions of Windows. To use all of the tools though, you will need Windows XP.
2. Testing your network
The tools in this guide can be accessed from the command prompt. While this can look a little intimidating, it is simple to use with a little bit of know-how.
Connection Settings
This guide assumes that you have checked and confirmed that your connection settings are correct. Broadband customers should first check our General Broadband Setup Guide.
Does your PC have a network connection?
Check the sockets. Most sockets have a connection light.
- The light is on when a connection is detected.
- The light flashes when data is passing through the connection.
- Click Start.
- Click Settings.
- Click Network Connections.
- Check the status of your network connection. If your connection is broken, your connection icon will show a small red cross.

- Right click on your connection icon.
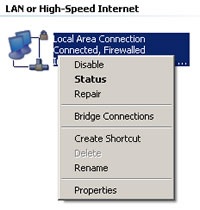
- Select Status to view details.
- If your connection is broken, click on Repair to attempt to reconnect.
3. Using the command line (DOS prompt)
To use the network tools described in this article you need to open a command line window. Command line looks like the old DOS environment, and is used through typed commands rather than with a graphical interface.
To open command line:
- Click Start.
- Click Run (or press the r key).
- Type "cmd" into the 'Run' window.
- Click Return.
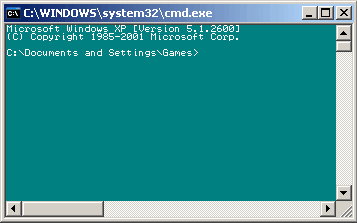
Although you can run these tools by typing them directly into the Run prompt, as soon as the command has finished, the window will close which will stop you from seeing the results.
Always open a command line window first before starting the tool.
Saving results to notepad
If you need to send results of your tests to the support team for further investigation, you can do so by copying them from the command line window, into notepad or another text editor.
To copy test results
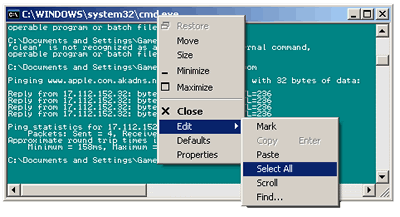
- Right Click on the title bar of the command line window.
- Click Edit.
- Click Select All.
- Click Enter.
- Paste into notepad.
- Save the notepad file to your hard drive.
Many tools will allow you to output the results to a text file instead of on the screen. To do this, type on the command line " [tool] > c:\test_results.txt".
For example - netstat > c:\netstat_results.txt
Then view the file using a text editor.
Which command line tools should I use?
I can connect but cannot view websites.
Ping - Trace route - DNS Lookup - Telnet
I can browse websites but cannot connect to email.
Ping - Trace route - Telnet
I have an intermittent connection problem.
Ping - Netstat - Netshell
(see our guide to Intermittent Connection Faults)
I think I have a virus problem on my system.
Netstat - DNS Lookup
(see our guide to Internet Security)
4. Ping - "Can my data reach you?"
Ping sends packets of data to another computer and measures how long it takes to get there. Ping results can tell you that -
- You are connected.
- Your connect is responsive (low latency).
- Your connection is consistent (not dropping out).
- In the command line window, type
"ping [destination address]". - Click Enter and watch for the results.
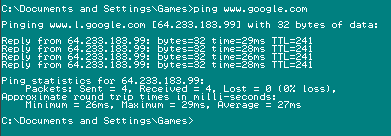
In the above example, note how Ping turns the web address "www.google.com" into the corresponding IP address 64.233.183.99
Ping sends four packets and gives you an Average for the time it takes for the ping to make the round - in the above example it is 27 milliseconds.
Ping responses
| Response | Explanation |
| Ping request could not find host... | Check your destination address. |
| Reply from... | Destination is responding. |
| Request timed out... | Destination not responding. |
Continuous Ping
Ping sends four packets of data, which isn't very good at showing problems that are intermittent. A continuous Ping can be useful if you think there might be a problem with cables, as you can see exactly when connection problems are occurring.
To use Continuous Ping
- In the command line window type
"ping [destination address] -t". - Click Enter and watch for the results.
- when you want to end the ping press Control and C together.
Is an enhanced form of ping that provides some of the information you would gain from using the trace route tool. It is most useful for identifying where a connection problems is occurring.
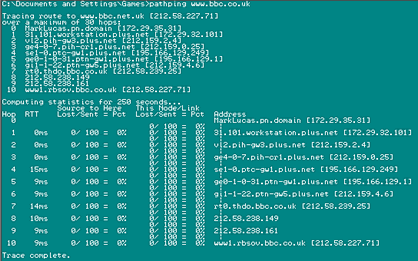
1) In the command line window type "pathping [address]"
for example "pathping www.bbc.co.uk".
2) View the first set of results - which is a list of servers that your ping data travels through to reach the destination address. Each server that is passed through on the route is known as a hop.
You will see the message "Computing Statistics for 250 seconds..." Pathping is now monitoring data through each of the servers, looking to see if any of them are responding slowly, or intermittently. The longer the route to the destination, the more time will be required for the test.
Once complete, you'll see a table that shows if any of the servers are dropping packets of data. If a server is faulty or overloaded you might see a high percentage of lost packets.
Watch our video tutorial -
Running A Ping Or Tracert to Diagnose Problems ![]()
5. Traceroute - "How does my data reach its destination?"
Trace route shows you the route your data packets are taking to reach a destination system. Trace route results can show -
- Problems with the system you are trying to connect to.
- Problems with the network between you and the destination system.
- Problems with your own network setup (Firewall or router problems).
| Response | Explanation |
| Unable to resolve target system ... | Check your destination address. |
| Trace complete | Trace route worked |
| Request timed out... | Destination not responding. |
| Destination network unreachable | Indicates a network problem |
Destination network unreachable - this means that a device that the you are sending data to is not responding, it my down, or there might be a network fault. This type of problem is usually outside PlusNet's control.
6. DNS Lookup - "Is my computer data going to the right place?"
DNS (Domain Name System) turns your user-friendly web addresses into the numerical IP addresses that are used by computer systems. If you have a working connection, but can't view popular websites like BBC or Google, then faulty DNS settings may be the cause.
Flush DNS Cache
The first thing you should do is remove the saved DNS information in your computer, this may now be out of date.
To Flush your DNS Cache
- In the command line window, type "ipconfig /flushdns"
- Click Enter.
- Watch for the flush to complete with the message. "Successfully flushed the DNS Resolver Cache."
- Retest to see if you can browse popular websites.
DNS lookups
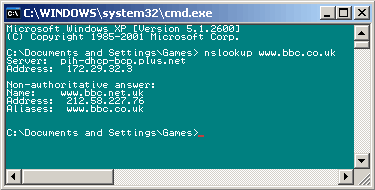
You can test to see if your DNS is working properly by doing a DNS lookup, using the command line tool nslookup.
To do a DNS Lookup
- In the command line window, type
"nslookup[Website Address] "
for example "nslookup www.bbc.co.uk" - Click Enter.
- Check the results to see if an (IP) address is found that corresponds with the name of the website address. If your DNS is not working properly, nslookup won't be able to return an IP address.
7. Netstat - "what's my computer connecting to?"
Netstat tells you what your computer is connected. This makes if useful for seeing if your computer is connected to servers that you don't know about. If you suspect that your computer is infected with "Spyware" or certain types of virus Netstat may help you find them out.
To run Netstat
- In the command line window, type "netstat -a"
- Click Enter
- View the list of connections on your PC.
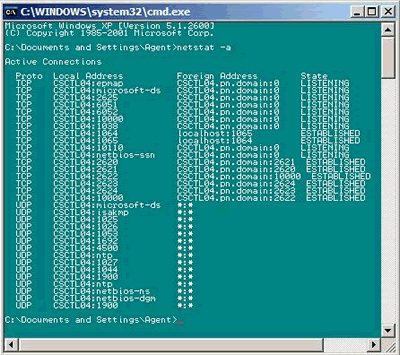
Different programs and processes may connect to remote computers. In most cases there is nothing to worry about. The two things to look for are the numbers after the colon (port numbers), and the Foreign Addresses. Ports are the doorways that different computer programs use to send data over a network. For example, browser traffic uses Port 80, email uses ports 25 and port 110. View a full list of official port numbers
If you are worried that your system has been infected with a trojan, or similar virus, you may be able to spot the connection it uses. The port numbers that are associated with Spyware and Trojans are changing all the time - its always best to make sure you have updated anti-virus and firewall software running on your computer.
Foreign addresses are the systems that are connected to your computer that appear to be remote. While it can be hard to know what to look for, one solution is to run netstat while no programs are running and save the results to compare later.
8. Telnet - "Can I connect to it?"
Telnet is a program that allows you to access and use other computers remotely. It has lots of uses for testing problems because it can let you manually test Internet services as if you were a browser or email program. You can then see if a problem you have is due to the service or your computer setup.
You can use telnet to confirm that a service like email is accepting connections.
A telnet client is included with most versions of Windows, though in Windows Vista it has to be added as follows:
Click Start > Control Panel > Programs, and then Turn Windows Features on or off. In the list, scroll down and select Telnet Client. Click OK to start the installation.
A better telnet program, called Putty is available to download for free - Download Putty telnet client.
Problem receiving email - test your mailbox
- In the command line window type
"telnet mail.plus.net 110" - Click Enter.
- You should be connected to the mailserver - you should see the response "+OK Hello there" which confirms the mailserver is OK.
- Type 'user [username]' where [username ] is your account mailbox username.
- Click Enter.
- You should see a message "+OK Password required".
- Type "pass
, for example, if your password is pa55w0rd you should type pass pa55w0rd. - Click Enter.
- You will see the message "+OK Logged in". You are now in your mailbox and can be sure your email account details are correct, and that the mail server is responding to connections.
If you're normal mail program is unable to connection, you should consider checking that your settings are correct, or reinstalling the program.
Problem sending email - test you access to our mail relay server
- In the command line window type
"telnet relay.plus.net 25". - Click Enter.
- You should see a response that begins "220" which indicates that you have successfully connected to the mail relay server. If you don't get a response that beings with "220" then either the relay server is not responding, or port 25 is being blocked.
9. Netshell - "One-stop network check"
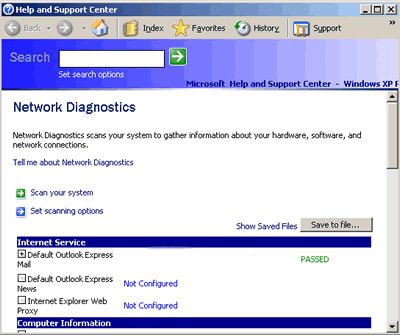
Netshell is a tool that allows you to check that Windows is properly setup for networking. It can test many different aspects of your network connection, depending on what you have got setup on your system.
To use Netshell
- In the command line window, type "netsh diag gui".
- Click Enter.
- A Network Diagnostics Window will open.
- Click Scan your system to begin testing, or Set scanning options to change which things you want Netshell to test.
http://www.plus.net/support/broadband/troubleshooting/testing_faults.shtml
Comments
Post a Comment